Thursday, April 1, 2010

Green CopyCat

Sometimes I like to pretend I'm the Pioneer Woman.

But then I remember that she has a successful blog with millions of followers, she lives on a ranch, and can cook...without a recipe.  None of which are true of me.

So, in true Pioneer Woman style, I picked out some of my favorite green photos from flickr. All of these photos (while not actually submitted to the Pioneer Woman's Photography Assignment Group) are shared under the Creative Commons License.

I'll start with my absolute all-time favorite:

green door
{photo by tuis}


a little green
{photo by mbgrigby}


green door
{photo by Pieter Mustard}

pears
{photo by beaker9}


Enjoy these first days of spring!
............................................................................................

And don't forget about the GIVEAWAY that ends Monday, April 5th!


 Quirky Beauty Giveaway

........................................

"Jesus said unto her, I am the resurrection, and the life: he that believeth in me, though he were dead, yet shall he live: And whosoever liveth and believeth in me shall never die..."
~John 11:25-26
.......................................


Photobucket

Tuesday, March 30, 2010

... a Giveaway!


 Quirky Beauty Giveaway

This is an exciting day for me – the day of my first giveaway! Keep reading to find out more.

Quirky Beauty is a shop full of absolutely beautiful hairpieces and other accessories. As someone who enjoys nature, I find Dana’s nature-inspired pieces just gorgeous.

 Quirky Beauty Giveaway  Quirky Beauty Giveaway  Quirky Beauty Giveaway  Quirky Beauty Giveaway  Quirky Beauty Giveaway

Dana kindly answered some interview questions for us so that we could get to know her. Here’s what she had to say:

Tell us a little about yourself. Do you have a family? Pets?
I'm a newlywed. Married almost 1 whole year to my wonderful husband, Harry. He is a professional photographer (he also takes all of the quirkybeauty photos!). Here's his website: www.harrygils.com. We have two cats, Kitty (girl) and Basil (boy) who are very spoiled and loved.

How and when did you get started making beaded headbands and other accessories?
I'm trained as a painter and a fashion stylist for some big department stores in Toronto. I would often make headpieces for mannequins and other props. (You can see some of my work on my website www.dcowie.com) When I was planning my wedding look I decided to make my own headpiece. I wasn't finding anything out there that was what I wanted so I started experimenting. That lead to messing about with beads and sewing until I found my passion for beading. It took several months to iron out my line on Etsy through trial and error.

What is your favorite item to make? Do you have any you dread?
I love starting a new project. I'll have an idea and sketch it out then I'll just start working and see what happens. I don't dread anything in terms of making my accessories. I just dread not pleasing people. I'm a real people-pleaser by nature which can be good or bad depending.

What does a typical weekday look like for you?
I wake up and immediately make coffee (french press!). I then check my emails, get dressed etc. Then I get sewing immediately. Each piece takes me anywhere from 1.5 - 5 hours to make as they are all hand sewn/beaded. I usually listen to some favorite Brit coms or music while I work. Then I package them up and walk to the post office for shipping!

Where do you see your business in 10 years?
I'm hoping to be still creating wonderful accessories and hopefully making some clothing. My mother raised me with all hand made clothes and I would love to make my own and include them in the line. We shall see. A lot can happen in 10 years. I'd like to be in international shops and more magazines. I have big goals.

What is one of the largest obstacles you have had to overcome with your business?
I suppose I have to come to grips with lulls in the business. Sometimes it can be so busy and other days it can be quite slow. I love to work (work-a-holic!)and keep busy and can be quite obsessive about my shop. I've been learning how to use that time to make new designs and market my line.

What inspires your new designs?
I take inspiration from nature, history and architecture mostly. I love fashion and always keep in the loop about what's going on (I've been doing that since I was a little girl in the 80's). I'm also a huge anglophile and am inspired by the English and their aesthetic.

Do you have any favorite traditions?
I don't know if I have any traditions...I am a family girl, I love family dinners. I lead a simple life and I live to make things. As long as I'm making things and doing it on my own turf I'm happy.

__________________________________________

Dana of Quirky Beauty is so generous to be giving away this beautiful headpiece, great for any occasion, and in perfect time for spring!

 Quirky Beauty Giveaway    Quirky Beauty Giveaway

To enter, all you need to do is tell me what your favorite thing is about SPRING, and please leave me a way to contact you as well.
I’ll use random.org to choose a winner on Monday, April 5th!


Photobucket

Monday, March 29, 2010

Favorite Spring Color Winner: Turquoise!

Many of you noticed the poll I had on my sidebar the past week or so - well, the results are in!

Lively Turquoise
is the winner of the best spring color poll., with vibrant green trailing close behind!

In honor of lively turquoise, I found these beautiful, inspirational homes to show you:

turquoise kitchen
{What I love}
  • The functionality - huge counter space.
  • The tile behind the stove - while very powerful, it's subdued nicely with the beige wall.
  • The solid theme - turquoise and brown, with splashes of orange (look in that back corner).

turquoise living room
{What I love}
  • The earthy natural colors with the sudden pop of turquoise wing backed chairs.
  • The contrast of the bright yellow green pillows on the turquoise chairs.
  • The warmth of the fireplace in the background.
  • The solid white walls and beams.

childrens turquoise bedroom
{What I love}
  • The modern curves and lines.
  • The functionality - lots of desk space and closet space.
  • So much light!

turquoise kitchen
{What I love}
  • The beautiful white tile offset by the blue walls.
  • The huge bowl of pears!  What could be better?
  • The open shelving - while dangerous for me, if you can keep it clean, more power to you!

turquoise bedroom
{What I love}
  • The bedding - just beautiful and so comfortable looking, too.
  • That lamp in the background - love the modern base and beautiful shade.
  • The greenery in the background - adds a pop of contrast among the light blues.


Photobucket

Matthew Mead Contest


Head over to Holiday with Matthew Mead to find out how you can win the opportunity to have your blog or online shop mentioned in the magazine. Holiday with Matthew Mead is a "book-azine" celebrating and offering inspiration for the Christmas holiday season. To be released in October 2010, Holiday is offered via online orders only - in limited quantities - and will not be sold on newsstands. But, by simply following the BUY HOLIDAY MAGAZINE link below their banner, you can reserve your own copy of this beautiful magazine, with guaranteed delivery of the magazine straight to your mailbox! Holiday with Matthew Mead is144 pages of holiday inspiration with well-known and admired designers, bloggers and top-notch features, printed on beautiful paper and not drowning in ads!
Now, head on over for your chance to win!


Photobucket

Saturday, March 27, 2010

Bird Flying Kite Painting

My Saturday night project:


My idea for this came from the Etsy shop Artocrat by Pragya K. I love her giclee prints, but decided that I'd like to try my hand at painting my own version in acrylic. Rather than tying the bunting between the bird's beak and a tree, I enlisted my husband to help me come up with my own version... his idea was a kite, and I think it worked beautifully!

Pragya's prints are to die for, though, and I think I still like hers better - something about the clean lines of the print just grabs me!  Her entire shop is full of colorful birds and beautiful prints, and I encourage you to check it out.  Here is her original idea:


Photobucket

Friday, March 26, 2010

How To Make Your Own Banner

Today I am going to show you how to make an Etsy or blogger banner for free, using the online photo editing program called picnik! Etsy banners are very simple to make, but can often be very frustrating if you're not used to using photo software. For those of you without an Etsy shop, but with a blog, it's also nice to have a banner stating your name and what you do at the top of your blog, rather than just text. This will teach you how to do that!

I'm going to use a standard Etsy banner size to do this, which is 760 pixels wide by 100 pixels tall. If you're not familiar with pixels, it's ok, you really don't need to be. It's basically just the way computers measure size, similar to inches or centimeters. A one by one pixel square is just a very very tiny dot on your computer screen.

First, let me give you the starting template. This is just a plain old rectangle, but I've colored it a very slight gray. This color will not necessarily show up in your final banner unless you want it to, but it's easier to see in picnik.

To start, click on the image below. It will open in a new window (it is necessary to open it in a new window in order to get the correct size).  Then right click the image, and save it to your computer somewhere where you will remember it. Feel free to rename it however you'd like.

blank etsy banner

Now head over to picnik. You'll see this:
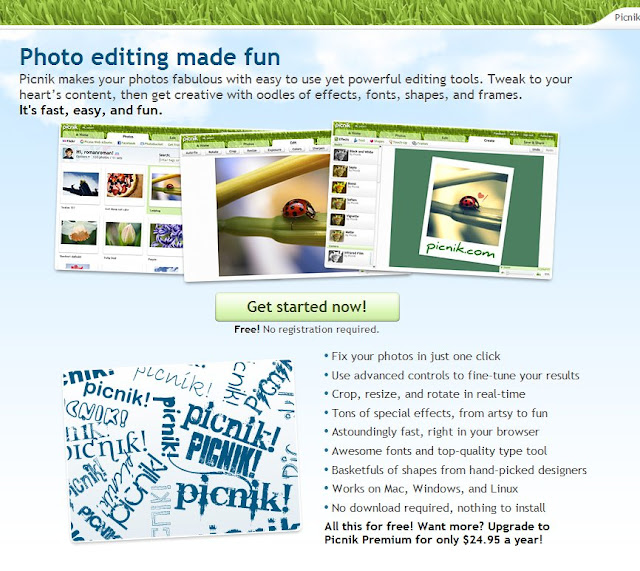


Go ahead and click on 'Get started now!' You'll then want to click 'Upload photos' and choose the image that you just saved.

Now you will see the gray box in picnik. We're ready to get going now!

Click the tab at the top that says "Create". Below that, click on "Text".

For now, we're going to leave the gray box - we can change it later.  Instead, we're going to go ahead and add some text, like your blog or shop name, and a tag line. To do this, click on the "text" button.   In the box, type your blog/shop name, I'll use Creek Bed Threads. Click "Add". Now you can change the color to whatever you'd like.  Remember, we'll change the background color in a minute.  Look for the "text properties" box and click whichever color you'd like. To change the font, click any font on the left side menu.  Make sure you don't choose a "Premium" font, though, you have to pay for these!  There are a lot of great free fonts available.

You can also resize your text by dragging the corners of the text box.  To add additional text, just head back to the box in the top left, type your additional text, and click "Add".
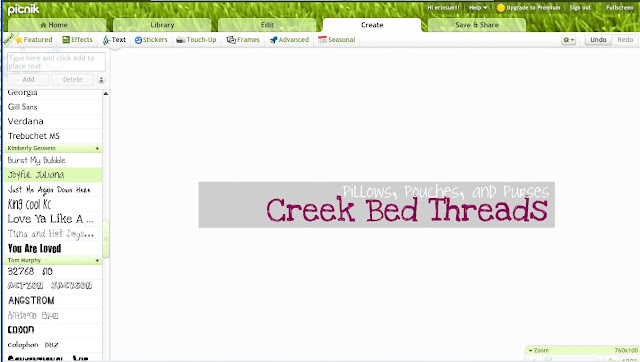


Now we're going to add some color behind the text. Click on the "Stickers" link, which is right next to the "Text" link you clicked earlier.
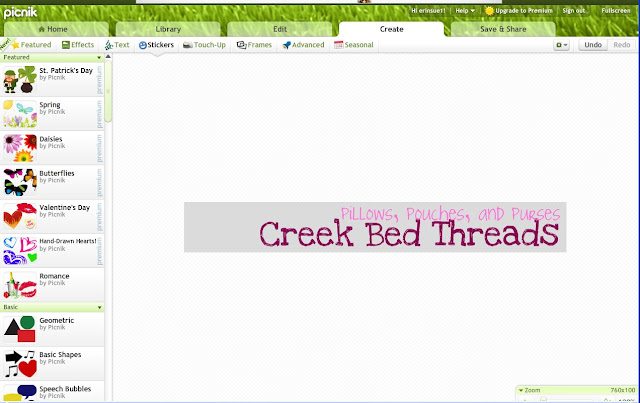


Look along the left hand side of your screen. You'll see many different options. The first thing we want to do is change the background color. To do this, we're just going to add a solid colored rectangle. Scroll down until you see "Geometric" and click on it. Click on your image and drag it to create a new box. Use the sizing handles to make it about the same size, or a little larger, than the original gray box. Now you can adjust the color of the rectangle by choosing a color in the "sticker properties" box. Just click anywhere on the colors shown to choose the color you want. I've shown this one in pink.


But what happened to our text????  With the rectangle selected, right click and click "send to back".  This will put it behind your text!

Now is the time you may want to play with placement, colors, etc. Each time you click on an object (your rectangle, text, etc.) you will see a properties box. This is where you can change the color, font, etc.

If you'd like a border around your image, add another rectangle in the same manner as before, but size it slightly smaller than your image. This will create a "border". Again, it will hide your text at first, but right click and click "send backward" ("send to back" will push it too far back). Repeat the right click - "send backward" until you can see all of your text.

Ok, now it's time to make it pretty. Make sure you're still on the "Stickers" menu. Now you can scroll around and check out all of the fun images and icons they have for you to use. There are many options! Beware for the "premium only" icons, though, you can't get these for free. Keep scrolling down and there will be more free options!

Here is what I chose to do. Notice that I changed my background rectangle to pink, and added another white rectangle on top - but this time I used the option with the rounded corners rather than the square corners. I also added some squiggly leaf things - these are actually two stickers that I arranged to touch, making it look like one. You can easily flip, rotate, and otherwise edit the stickers from the properties window that shows up when you click the object. Remember, to change the layering of any object, right click on it, and click "send backward" or "bring forward". If you want to send it all the way to the back or front of your objects, click "send to back" or "bring to front".
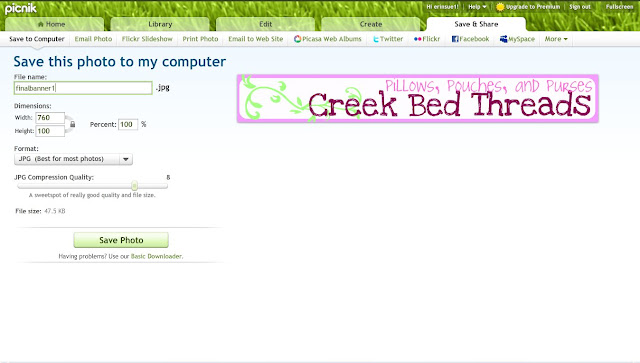


Here is another option I played around with, just keeping the gray background.
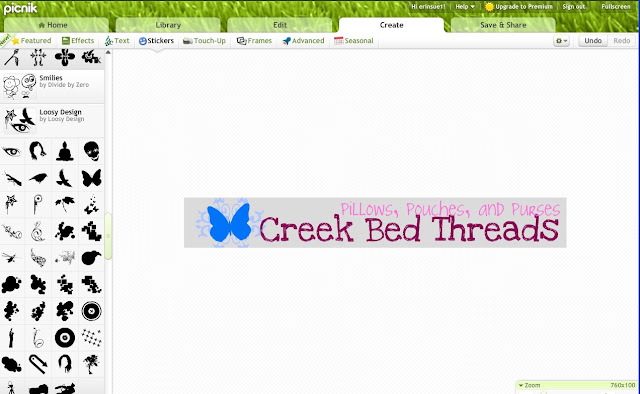


Once you're satisfied, click the "save and share" tab.  It should realize that you want to save it at 760x100 pixels, but just check to make sure.  Then click "save photo"!  That's it!  Now it's ready to be added to your shop or blog.



I would LOVE to see your creations if you try this!  Please leave links!  And if you have questions or need clarification on anything, just ask below and I'll try to respond below as well.

Photobucket
Related Posts with Thumbnails